
Integrating Azure OpenShift with Azure Files

In this blog, I want to take you through step by step on how to integrate Azure OpenShift with an Azure file share. For those new to Kubernetes, I have an introduction blog here that I recommend reading before continuing.
Understanding The Use Case
To provide some context as to why you would integrate OpenShift with Azure files we first need to understand the concept of containers. Containers are meant to be stateless and lightweight to ensure application start time is reduced. Many developers are moving to use containers to run their applications and as a result, require container orchestration platforms such as Kubernetes to achieve an automated environment. Since containers are stateless, we encounter a problem if the application needs to persist data in any way. If this is the case for your application, a good practice is to separate storage management from your containers. In the context of OpenShift (Kubernetes), there is the concept of volumes that your containers running in pods can reference to persist data. OpenShift offer’s nice integrations with Azure files which I will show off in this blog.
OpenShift will deploy its resources to what is referred to as an ‘Application Managed Resource Group’. This resource group will have a read-only lock on it and will include deny assignments to ensure the customer (us), cannot make changes in that resource group. This becomes problematic in the case of Azure files since we need access to the file share to interact with it. With that in mind, we need to deploy an Azure file share to a resource group that we control. In the following sections I will show off the OpenShift objects required to facilitate connecting to an Azure file share in a resource group we control.
Implementation
The implementation part of this blog will be focused on the setup and configuration from an OpenShift perspective.
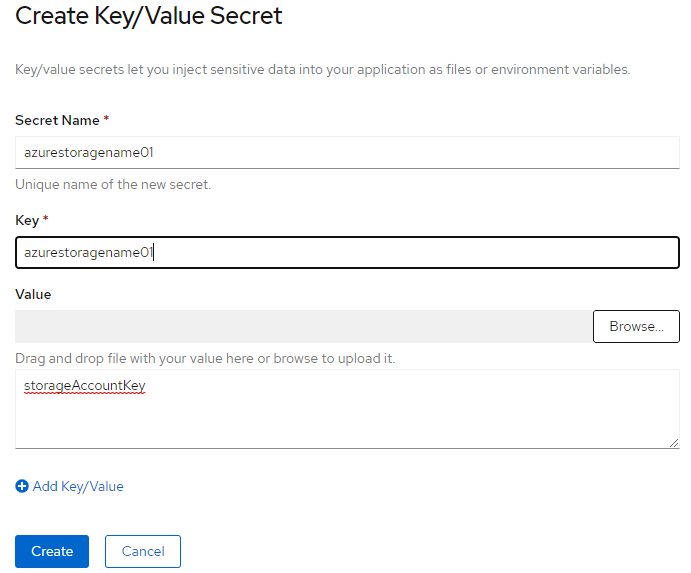
Create a Secret in OpenShift
Login to your OpenShift instance and navigate to ‘Secrets’. In the top right-hand corner, select ‘Create’ and select ‘Key/Value Secret’

Configure the secret as follows:
Create Storage Class
Storage classes help classify the type of storage you are wanting to connect to. OpenShift supports many different storage types. In this case, we want to use the type “Azure File”. There are some properties below you will have to edit for your particular use case. I have added comments to the YAML file below but if you would like more information please see the storage class schema here
kind: StorageClass
apiVersion: storage.k8s.io/v1
metadata:
  # Place desired name of the storage class
  name: azurefileclass
provisioner: kubernetes.io/azure-file
parameters:
  # Location of Azure files
  location: eastus2
  # Your OpenShift namespace
  secretNamespace: openshiftnamespace
  # The SKU of your Azure files
  skuName: Standard_LRS
  # The name of your Azure files
  storageAccount: azurestoragename01
  # The resource group of your Azure files
  resourceGroup: azurerg
reclaimPolicy: Delete
volumeBindingMode: Immediate
Create a Persistent Volume
The difference between a persistent volume (pv) and a persistent volume claim is still very unclear to me. As I understand it, a pv is a physical volume on the Kubernetes cluster which will store your data. The below YAML file will once again require changes for your use case and I have added comments to highlight that. For more information on the persistent volume schema, you can check that out here
apiVersion: "v1"
kind: "PersistentVolume"
metadata:
  # Place desired name of the persistent volume
  name: "azurepv"
spec:
  capacity:
    # The size of the Azure files share
    storage: "10Gi"
  accessModes:
    - "ReadWriteOnce"
  # The name of the storage class created above
  storageClassName: azurefileclass
  azureFile:
    # The name of the secret created earlier
    secretName: azurestoragename01
    # The share located in Azure files
    shareName: share
    # Your OpenShift namespace
    secretNamespace: openshiftnamespace
    readOnly: false
Create a Persistent Volume Claim
A persistent volume claim (pvc) will request the Kubernetes cluster to created a pv. In turn, the pvc will attach a pv to your pod. You can check out the YAML scheme here. Please note the comments in the below YAML.
apiVersion: "v1"
kind: "PersistentVolumeClaim"
metadata:
  # Place desired name of the persistent volume claim
  name: "azurepvc"
spec:
  accessModes:
    - "ReadWriteOnce"
  resources:
    requests:
      # The size of the Azure files share
      storage: "10Gi"
  # The name of the storage class
  storageClassName: azurefileclass
  # The name of the persistent volume
  volumeName: "azurepv"
Create a Deployment Config
Last but not least, let’s create a deployment config. Deployment configs are awesome because they will spin up replication controllers to ensure you have as many pods as you specify in the YAML file. For more details on the deployment config YAML schema click here. Please note the comments in the below YAML.
apiVersion: apps/v1
kind: Deployment
metadata:
  name: azurefilesapp
  # Your OpenShift namespace
  namespace: openshiftnamespace
spec:
  selector:
    matchLabels:
      app: azurefilesapp
  replicas: 1
  template:
    metadata:
      labels:
        app: azurefilesapp
    spec:
      volumes:
        - name: azure-file-share
          persistentVolumeClaim:
            # The name of the persistent volume claim
            claimName: azurepvc
          volumeMounts:
            - name: azure-file-share
              mountPath: /data1
Results
Navigating to your deployment config, jumping into the terminal of the pod, and navigating to /data1 you should be able to ‘touch’ a file and see that file creation reflected in Azure.